
Sometimes a simple hat is the best! This free single crochet beanie pattern for men is super easy to make and it comes in a variety of sizes from newborn to adult. Pick up a convenient, print-optimized PDF here, or scroll down to follow the instructions on this site.
+ Go here to save this pattern for later in your Ravelry queue +

Skill:
Beginner/Easy
Techniques used: “magic circle”, post stitches, surface slip stitching, single crochet
This men’s hat pattern uses easy single crochet stitches and even a beginner can crochet it! I have also included some optional surface slip-stitched details, and a simple ribbed brim to give it a more finished look.
Disclaimer: This post contains affiliate links. When you purchase something using these links we get a small cut of the earnings. You do not pay any extra for the item you purchase.
Tools and Materials List:

These are things you may already have on hand. Click on the item to purchase if you do not own one already:
- 5mm hook, or hook needed to obtain gauge
- 50-150 yards #4 worsted weight Red Heart Super Saver yarn in the colors of your choice
- Scissors
- Yarn needle
- Ruler or Measuring tape
I used #4 worsted weight Red Heart Super Saver yarn for this project. It is an acrylic yarn that is easy to care for, and it’s sold in most big box craft stores in the US. I used Café Latte, Buff, Medium Thyme, and Tea Leaf to crochet my sample men’s beanies, but since there are so many other colors to choose from use what hue you think will work best for your project. If you decide to substitute with a different type of yarn please pay close attention to the gauge information shared a little further down the page.
Additional Supplies (Optional):
How to make a single crochet hat

This easy single crochet hat for men and boys is worked in the round. You will start it out with a magic circle, or you can chain-2 and then work all the stitches for the round in the 2nd chain if you prefer that method.
Crocheting a hat in the round is easy, and you should start to notice a pattern early on with the way the stitches are worked. After you complete the increase rounds it’s as simple as working 1 single crochet in each stitch and then joining the round with a slip stitch. Keep scrolling down to get to the free hat pattern instructions!
Stitch Glossary:
- ch = chain
- sl st = slip stitch
- sc = single crochet
- FPsc = Front Post single crochet
- BPsc = Back Post single crochet
Gauge:
- 4 3/4” across after round 9, or 5 1/4 after round 10
- 14 sc in 4”, 4 rows of sc gives 1” of height.
Finished Measurements:
- Newborn: 4” tall, 6 1/2” wide
- 0-3 mos hat: 4 1/2” tall, 7” wide
- 3-6 mos: 5” tall, 7 1/2” wide
- 6-12 mos 5 1/2” tall, 8” wide
- Toddler (1-2 yrs): 6” tall, 8 1/2” wide
- Child (4-8 yrs): 7” tall, 9 1/2” wide
- Teen/Small Adult: 8” tall, 10 1/2” wide
- Medium Adult: 9” tall, 11” wide
- Large/X-Large Adult: 9” tall, 11 1/2” wide
Additional Notes and Information:
Please read through the pattern and all notes before you begin. Pay special attention to the techniques used. If you do not understand something, take a look at the following tutorials:
Magic Circle
Front Post single crochet
Back Post single crochet
Surface Slip Stitch
- ch-1 at beginning of round does not count as a stitch.
- all rounds are joined with a slip stitch.
- If you are brand new to crochet and do not feel comfortable working the post stitches in the band you may work 3 more rounds of single crochet at the end of each hat instead.

Simple Single Crochet Hat Pattern (US Terms):
Click here to grab a printable PDF with all 9 hat sizes on LoveCrafts
Newborn
Round 1: ch 1, 6 sc in magic circle, join with sl st to first sc. (6)
Round 2: ch 1, 2 sc in each st around, join with sl st to first sc. (12)
Round 3: ch 1, 2 sc in first st, sc in next st *2 sc in next st, sc in next st; repeat from * around, join with sl st to first sc. (18)
Round 4: ch 1, 2 sc in first st, sc in next 2 sts, *2 sc in next st, sc in next 2 sts; repeat from * around, join with sl st to first sc. (24)
Round 5: ch 1, 2 sc in first st, sc in next 3 sts, *2 sc in next st, sc in next 3 sts; repeat from * around, join with sl st to first sc. (30)
Round 6: ch 1, 2 sc in first st, sc in next 4 sts, *2 sc in next st, sc in next 4 sts; repeat from * around, join with sl st to first sc. (36)
Round 7: ch 1, 2 sc in first st, sc in next 5 sts, *2 sc in next st, sc in next 5 sts; repeat from * around, join with sl st to first sc. (42)
Round 8: ch 1, 2 sc in first st, sc in next 16 sts, *2 sc in next st, sc in next 16 sts; repeat from * around, join with sl st to first sc. (45)
Rounds 9-12: ch 1, sc in each st around, join with sl st to first sc. (45)
Band:
Round 13: ch 1, FPsc around first st, BPsc around next st, *FPsc around next st, BPsc around next st; repeat from * around, FPsc around final st, join with sl st to first FPsc. (45)
Rounds 14-15: ch 1, FPsc around first FPsc from prev round, sc in next st, * FPsc around next FPsc from prev round, sc in next st; repeat from * around, FPsc around final st, join with sl st to first FPsc. (45)
Fasten off, weave in ends.
Scroll to bottom of post for slip stitched detail instructions.
0-3 months
Round 1: ch 1, 6 sc in magic circle, join with sl st to first sc. (6)
Round 2: ch 1, 2 sc in each st around, join with sl st to first sc. (12)
Round 3: ch 1, 2 sc in first st, sc in next st *2 sc in next st, sc in next st; repeat from * around, join with sl st to first sc. (18)
Round 4: ch 1, 2 sc in first st, sc in next 2 sts, *2 sc in next st, sc in next 2 sts; repeat from * around, join with sl st to first sc. (24)
Round 5: ch 1, 2 sc in first st, sc in next 3 sts, *2 sc in next st, sc in next 3 sts; repeat from * around, join with sl st to first sc. (30)
Round 6: ch 1, 2 sc in first st, sc in next 4 sts, *2 sc in next st, sc in next 4 sts; repeat from * around, join with sl st to first sc. (36)
Round 7: ch 1, 2 sc in first st, sc in next 5 sts, *2 sc in next st, sc in next 5 sts; repeat from * around, join with sl st to first sc. (42)
Round 8: ch 1, 2 sc in first st, sc in next 6 sts, *2 sc in next st, sc in next 6 sts; repeat from * around, join with sl st to first sc. (48)
Rounds 9-14: ch 1, sc in each st around, join with sl st to first sc. (48)
Band:
Round 15: ch 1, FPsc around first st, BPsc around next st, *FPsc around next st, BPsc around next st; repeat from * around, join with sl st to first FPsc. (48)
Rounds 16-17: ch 1, FPsc around first FPsc from prev round, sc in next st, * FPsc around next FPsc from prev round, sc in next st; repeat from * around, join with sl st to first FPsc. (48)
Fasten off, weave in ends.
Scroll to bottom of post for slip stitched detail instructions.
3-6 months:
Round 1: ch 1, 6 sc in magic circle, join with sl st to first sc. (6)
Round 2: ch 1, 2 sc in each st around, join with sl st to first sc. (12)
Round 3: ch 1, 2 sc in first st, sc in next st *2 sc in next st, sc in next st; repeat from * around, join with sl st to first sc. (18)
Round 4: ch 1, 2 sc in first st, sc in next 2 sts, *2 sc in next st, sc in next 2 sts; repeat from * around, join with sl st to first sc. (24)
Round 5: ch 1, 2 sc in first st, sc in next 3 sts, *2 sc in next st, sc in next 3 sts; repeat from * around, join with sl st to first sc. (30)
Round 6: ch 1, 2 sc in first st, sc in next 4 sts, *2 sc in next st, sc in next 4 sts; repeat from * around, join with sl st to first sc. (36)
Round 7: ch 1, 2 sc in first st, sc in next 5 sts, *2 sc in next st, sc in next 5 sts; repeat from * around, join with sl st to first sc. (42)
Round 8: ch 1, 2 sc in first st, sc in next 6 sts, *2 sc in next st, sc in next 6 sts; repeat from * around, join with sl st to first sc. (48)
Round 9: ch 1, 2 sc in first st, sc in next 7 sts, *2 sc in next st, sc in next 7 sts; repeat from * around, join with sl st to first sc. (54)
Rounds 10-17: ch 1, sc in each st around, join with sl st to first sc. (54)
Band:
Round 18: ch 1, FPsc around first st, BPsc around next st, *FPsc around next st, BPsc around next st; repeat from * around, join with sl st to first FPsc. (54)
Rounds 19-20: ch 1, FPsc around first FPsc from prev round, sc in next st, * FPsc around next FPsc from prev round, sc in next st; repeat from * around, join with sl st to first FPsc. (54)
Hat should measure 5” long when completed.
Fasten off, weave in ends.
Scroll to bottom of post for slip stitched detail instructions.
6-12 months
Round 1: ch 1, 6 sc in magic circle, join with sl st to first sc. (6)
Round 2: ch 1, 2 sc in each st around, join with sl st to first sc. (12)
Round 3: ch 1, 2 sc in first st, sc in next st *2 sc in next st, sc in next st; repeat from * around, join with sl st to first sc. (18)
Round 4: ch 1, 2 sc in first st, sc in next 2 sts, *2 sc in next st, sc in next 2 sts; repeat from * around, join with sl st to first sc. (24)
Round 5: ch 1, 2 sc in first st, sc in next 3 sts, *2 sc in next st, sc in next 3 sts; repeat from * around, join with sl st to first sc. (30)
Round 6: ch 1, 2 sc in first st, sc in next 4 sts, *2 sc in next st, sc in next 4 sts; repeat from * around, join with sl st to first sc. (36)
Round 7: ch 1, 2 sc in first st, sc in next 5 sts, *2 sc in next st, sc in next 5 sts; repeat from * around, join with sl st to first sc. (42)
Round 8: ch 1, 2 sc in first st, sc in next 6 sts, *2 sc in next st, sc in next 6 sts; repeat from * around, join with sl st to first sc. (48)
Round 9: ch 1, 2 sc in first st, sc in next 7 sts, *2 sc in next st, sc in next 7 sts; repeat from * around, join with sl st to first sc. (54)
Round 10: ch 1, 2 sc in first st, sc in next 8 sts, *2 sc in next st, sc in next 8 sts; repeat from * around, join with sl st to first sc. (60)
Rounds 11-19: ch 1, sc in each st around, join with sl st to first sc. (60)
Band:
Round 20: ch 1, FPsc around first st, BPsc around next st, *FPsc around next st, BPsc around next st; repeat from * around, join with sl st to first FPsc. (60)
Rounds 21-22: ch 1, FPsc around first FPsc from prev round, sc in next st, * FPsc around next FPsc from prev round, sc in next st; repeat from * around, join with sl st to first FPsc. (60)
Hat should measure 5.5” long when completed.
Fasten off, weave in ends.
Scroll to bottom of post for slip stitched detail instructions.
Toddler (1-2 yrs)
Round 1: ch 1, 6 sc in magic circle, join with sl st to first sc. (6)
Round 2: ch 1, 2 sc in each st around, join with sl st to first sc. (12)
Round 3: ch 1, 2 sc in first st, sc in next st *2 sc in next st, sc in next st; repeat from * around, join with sl st to first sc. (18)
Round 4: ch 1, 2 sc in first st, sc in next 2 sts, *2 sc in next st, sc in next 2 sts; repeat from * around, join with sl st to first sc. (24)
Round 5: ch 1, 2 sc in first st, sc in next 3 sts, *2 sc in next st, sc in next 3 sts; repeat from * around, join with sl st to first sc. (30)
Round 6: ch 1, 2 sc in first st, sc in next 4 sts, *2 sc in next st, sc in next 4 sts; repeat from * around, join with sl st to first sc. (36)
Round 7: ch 1, 2 sc in first st, sc in next 5 sts, *2 sc in next st, sc in next 5 sts; repeat from * around, join with sl st to first sc. (42)
Round 8: ch 1, 2 sc in first st, sc in next 6 sts, *2 sc in next st, sc in next 6 sts; repeat from * around, join with sl st to first sc. (48)
Round 9: ch 1, 2 sc in first st, sc in next 7 sts, *2 sc in next st, sc in next 7 sts; repeat from * around, join with sl st to first sc. (54)
Round 10: ch 1, 2 sc in first st, sc in next 8 sts, *2 sc in next st, sc in next 8 sts; repeat from * around, join with sl st to first sc. (60)
Round 11: ch 1, 2 sc in first st, sc in next 19 sts, *2 sc in next st, sc in next 19 sts; repeat from * around, join with sl st to first sc. (63)
Rounds 12-21: ch 1, sc in each st around, join with sl st to first sc. (63)
Round 22: ch 1, FPsc around first st, BPsc around next st, *FPsc around next st, BPsc around next st; repeat from * around, FPsc around final st, join with sl st to first FPsc. (63)
Rounds 23-24: ch 1, FPsc around first FPsc from prev round, sc in next st, * FPsc around next FPsc from prev round, sc in next st; repeat from * around, FPsc around final st, join with sl st to first FPsc. (63)
Fasten off, weave in ends.
Scroll to bottom of post for slip stitched detail instructions.
Hat should measure 6” long when completed.
Children (4-8 yrs)
Round 1: ch 1, 6 sc in magic circle, join with sl st to first sc. (6)
Round 2: ch 1, 2 sc in each st around, join with sl st to first sc. (12)
Round 3: ch 1, 2 sc in first st, sc in next st *2 sc in next st, sc in next st; repeat from * around, join with sl st to first sc. (18)
Round 4: ch 1, 2 sc in first st, sc in next 2 sts, *2 sc in next st, sc in next 2 sts; repeat from * around, join with sl st to first sc. (24)
Round 5: ch 1, 2 sc in first st, sc in next 3 sts, *2 sc in next st, sc in next 3 sts; repeat from * around, join with sl st to first sc. (30)
Round 6: ch 1, 2 sc in first st, sc in next 4 sts, *2 sc in next st, sc in next 4 sts; repeat from * around, join with sl st to first sc. (36)
Round 7: ch 1, 2 sc in first st, sc in next 5 sts, *2 sc in next st, sc in next 5 sts; repeat from * around, join with sl st to first sc. (42)
Round 8: ch 1, 2 sc in first st, sc in next 6 sts, *2 sc in next st, sc in next 6 sts; repeat from * around, join with sl st to first sc. (48)
Round 9: ch 1, 2 sc in first st, sc in next 7 sts, *2 sc in next st, sc in next 7 sts; repeat from * around, join with sl st to first sc. (54)
Round 10: ch 1, 2 sc in first st, sc in next 8 sts, *2 sc in next st, sc in next 8 sts; repeat from * around, join with sl st to first sc. (60)
Round 11: ch 1, 2 sc in first st, sc in next 9 sts, *2 sc in next st, sc in next 9 sts; repeat from * around, join with sl st to first sc. (66)
Rounds 12-24: ch 1, sc in each st around, join with sl st to first sc. (66)
Round 25: ch 1, FPsc around first st, BPsc around next st, *FPsc around next st, BPsc around next st; repeat from * around, join with sl st to first FPsc. (66)
Rounds 26-27: ch 1, FPsc around first FPsc from prev round, sc in next st, * FPsc around next FPsc from prev round, sc in next st; repeat from * around, join with sl st to first FPsc. (66)
Hat should measure 7” long when completed.
Fasten off, weave in ends.
Scroll to bottom of post for slip stitched detail instructions.
Teen/Small Adult
Round 1: ch 1, 6 sc in magic circle, join with sl st to first sc. (6)
Round 2: ch 1, 2 sc in each st around, join with sl st to first sc. (12)
Round 3: ch 1, 2 sc in first st, sc in next st *2 sc in next st, sc in next st; repeat from * around, join with sl st to first sc. (18)
Round 4: ch 1, 2 sc in first st, sc in next 2 sts, *2 sc in next st, sc in next 2 sts; repeat from * around, join with sl st to first sc. (24)
Round 5: ch 1, 2 sc in first st, sc in next 3 sts, *2 sc in next st, sc in next 3 sts; repeat from * around, join with sl st to first sc. (30)
Round 6: ch 1, 2 sc in first st, sc in next 4 sts, *2 sc in next st, sc in next 4 sts; repeat from * around, join with sl st to first sc. (36)
Round 7: ch 1, 2 sc in first st, sc in next 5 sts, *2 sc in next st, sc in next 5 sts; repeat from * around, join with sl st to first sc. (42)
Round 8: ch 1, 2 sc in first st, sc in next 6 sts, *2 sc in next st, sc in next 6 sts; repeat from * around, join with sl st to first sc. (48)
Round 9: ch 1, 2 sc in first st, sc in next 7 sts, *2 sc in next st, sc in next 7 sts; repeat from * around, join with sl st to first sc. (54)
Round 10: ch 1, 2 sc in first st, sc in next 8 sts, *2 sc in next st, sc in next 8 sts; repeat from * around, join with sl st to first sc. (60)
Round 11: ch 1, 2 sc in first st, sc in next 9 sts, *2 sc in next st, sc in next 9 sts; repeat from * around, join with sl st to first sc. (66)
Round 12: ch 1, 2 sc in first st, sc in next 10 sts, *2 sc in next st, sc in next 10 sts; repeat from * around, join with sl st to first sc. (72)
The next few rounds will add height to your beanie. Some men prefer longer hats that can cover their ears and forehead to the eyebrows. Others prefer shorter beanies. The way this pattern is written should give you a hat that is 8” tall, so long as you meet gauge. If you need to make the hat longer add 2 rounds to the end for each 1/2” of length you wish to have. Then continue working the rest of the pattern.
Rounds 13-28: ch 1, sc in each st around, join with sl st to first sc. (72)
Band:
Round 29: ch 1, FPsc around first st, BPsc around next st, *FPsc around next st, BPsc around next st; repeat from * around, join with sl st to first FPsc. (72)
Rounds 30-31: ch 1, FPsc around first FPsc from prev round, sc in next st, * FPsc around next FPsc from prev round, sc in next st; repeat from * around, join with sl st to first FPsc. (72)
Hat should measure 8” long when completed.
Fasten off, weave in ends.
Scroll to bottom of post for slip stitched detail instructions.

Medium Adult
Round 1: ch 1, 6 sc in magic circle, join with sl st to first sc. (6)
Round 2: ch 1, 2 sc in each st around, join with sl st to first sc. (12)
Round 3: ch 1, 2 sc in first st, sc in next st *2 sc in next st, sc in next st; repeat from * around, join with sl st to first sc. (18)
Round 4: ch 1, 2 sc in first st, sc in next 2 sts, *2 sc in next st, sc in next 2 sts; repeat from * around, join with sl st to first sc. (24)
Round 5: ch 1, 2 sc in first st, sc in next 3 sts, *2 sc in next st, sc in next 3 sts; repeat from * around, join with sl st to first sc. (30)
Round 6: ch 1, 2 sc in first st, sc in next 4 sts, *2 sc in next st, sc in next 4 sts; repeat from * around, join with sl st to first sc. (36)
Round 7: ch 1, 2 sc in first st, sc in next 5 sts, *2 sc in next st, sc in next 5 sts; repeat from * around, join with sl st to first sc. (42)
Round 8: ch 1, 2 sc in first st, sc in next 6 sts, *2 sc in next st, sc in next 6 sts; repeat from * around, join with sl st to first sc. (48)
Round 9: ch 1, 2 sc in first st, sc in next 7 sts, *2 sc in next st, sc in next 7 sts; repeat from * around, join with sl st to first sc. (54)
Round 10: ch 1, 2 sc in first st, sc in next 8 sts, *2 sc in next st, sc in next 8 sts; repeat from * around, join with sl st to first sc. (60)
Round 11: ch 1, 2 sc in first st, sc in next 9 sts, *2 sc in next st, sc in next 9 sts; repeat from * around, join with sl st to first sc. (66)
Round 12: ch 1, 2 sc in first st, sc in next 10 sts, *2 sc in next st, sc in next 10 sts; repeat from * around, join with sl st to first sc. (72)
Round 13: ch 1, 2 sc in first st, sc in next 23 sts, *2 sc in next st, sc in next 23 sts; repeat from * around, join with sl st to first sc. (75)
The next few rounds will add height to your beanie. Some men prefer longer hats that can cover their ears and forehead to the eyebrows. Others prefer shorter beanies. The way this pattern is written should give you a hat that is 9” tall, so long as you meet gauge. If you need to make the hat longer add 2 rounds to the end for each 1/2” of length you wish to have. Then continue working the rest of the pattern.
Rounds 13-30: ch 1, sc in each st around, join with sl st to first sc. (75)
Band:
Round 31: ch 1, FPsc around first st, BPsc around next st, *FPsc around next st, BPsc around next st; repeat from * around, FPsc around final st, join with sl st to first FPsc. (75)
Rounds 32-33: ch 1, FPsc around first FPsc from prev round, sc in next st, * FPsc around next FPsc from prev round, sc in next st; repeat from * around, FPsc around final st, join with sl st to first FPsc. (75)
Hat should measure 9” long when completed.
Fasten off, weave in ends.
Scroll to bottom of post for slip stitched detail instructions.
Large/X-Large Adult
Round 1: ch 1, 6 sc in magic circle, join with sl st to first sc. (6)
Round 2: ch 1, 2 sc in each st around, join with sl st to first sc. (12)
Round 3: ch 1, 2 sc in first st, sc in next st *2 sc in next st, sc in next st; repeat from * around, join with sl st to first sc. (18)
Round 4: ch 1, 2 sc in first st, sc in next 2 sts, *2 sc in next st, sc in next 2 sts; repeat from * around, join with sl st to first sc. (24)
Round 5: ch 1, 2 sc in first st, sc in next 3 sts, *2 sc in next st, sc in next 3 sts; repeat from * around, join with sl st to first sc. (30)
Round 6: ch 1, 2 sc in first st, sc in next 4 sts, *2 sc in next st, sc in next 4 sts; repeat from * around, join with sl st to first sc. (36)
Round 7: ch 1, 2 sc in first st, sc in next 5 sts, *2 sc in next st, sc in next 5 sts; repeat from * around, join with sl st to first sc. (42)
Round 8: ch 1, 2 sc in first st, sc in next 6 sts, *2 sc in next st, sc in next 6 sts; repeat from * around, join with sl st to first sc. (48)
Round 9: ch 1, 2 sc in first st, sc in next 7 sts, *2 sc in next st, sc in next 7 sts; repeat from * around, join with sl st to first sc. (54)
Round 10: ch 1, 2 sc in first st, sc in next 8 sts, *2 sc in next st, sc in next 8 sts; repeat from * around, join with sl st to first sc. (60)
Round 11: ch 1, 2 sc in first st, sc in next 9 sts, *2 sc in next st, sc in next 9 sts; repeat from * around, join with sl st to first sc. (66)
Round 12: ch 1, 2 sc in first st, sc in next 10 sts, *2 sc in next st, sc in next 10 sts; repeat from * around, join with sl st to first sc. (72)
Round 13: ch 1, 2 sc in first st, sc in next 11 sts, *2 sc in next st, sc in next 11 sts; repeat from * around, join with sl st to first sc. (78)
The next few rounds will add height to your beanie. Some men prefer longer hats that can cover their ears and forehead to the eyebrows. Others prefer shorter beanies. The way this pattern is written should give you a hat that is 9” tall, so long as you meet gauge. If you need to make the hat longer add 2 rounds to the end for each 1/2” of length you wish to have. Then continue working the rest of the pattern.
Rounds 14-30: ch 1, sc in each st around, join with sl st to first sc. (78)
Band:
Round 31: ch 1, FPsc around first st, BPsc around next st, *FPsc around next st, BPsc around next st; repeat from * around, join with sl st to first FPsc. (78)
Rounds 32-33: ch 1, FPsc around first FPsc from prev round, sc in next st, * FPsc around next FPsc from prev round, sc in next st; repeat from * around, join with sl st to first FPsc. (78)
Hat should measure 9” long when completed.
Fasten off, weave in ends.
See below for slip stitched detail instructions.
Surface Slip Stitch Detail – All hat sizes:
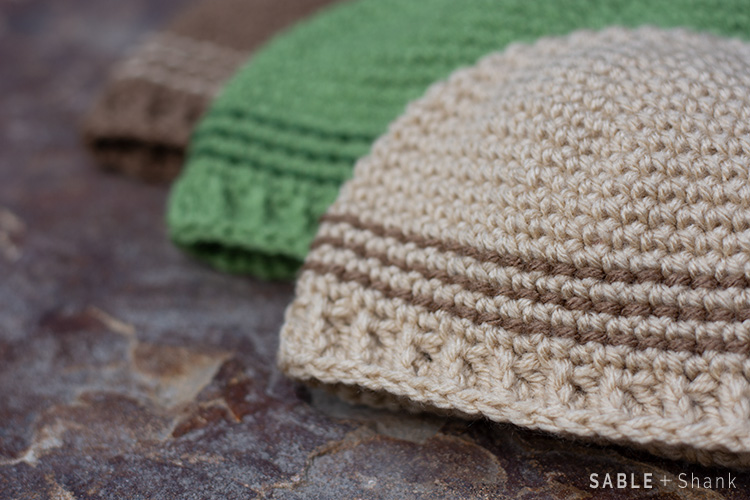
This technique is worked through the fabric from front to back side. I turn my hats inside out in order to get the fine line to show up on the outside of the hat. You will want to use very loose tension or even go up a couple of hook sizes for this part if you crochet tightly. Check your work periodically to make sure you have not lost any stretch in your hat.
Instructions:
Turn hat inside out, sl st with accent color between final 3 rounds of hat body (these are the sc rounds before you get to the first FPsc and BPsc round). Cut yarn and fasten off between each round.
Weave in all ends. Turn hat right-side out when finished.
Optional: Sew a leather tag to your hat. This will make your beanie look more professional, and finished.
Do you have this hat on your hook? We’d love to see your progress shots as well as pictures of the finished piece over at the SABLE + Shank Facebook group!
PATTERN TERMS AND CONDITIONS:
- You are welcome to share the link to this pattern, using one image of your choice, on your site if you are doing a review or pattern roundup.
- You are not given permission to share the written patterns themselves in any format either digital, or print. This includes Ravelry/LoveCrafts/Etsy downloads or translations of these patterns.
- You do not have permission to use the images on this site by themselves to create pinnable graphics for Pinterest, however they may be included in a roundup pin if there are 4 or more other patterns.
- If you sell finished items online, please do not use my pictures for your listings. Your customers will want to see an accurate representation of your skills. This builds trust and may turn them into repeat customers for your business (which means more income down the road for you). Honesty is a good look on everyone.
This pattern was made to be used by individuals, and small business crocheters alike. Selling your finished pieces in boutiques, at farmer’s markets, craft shows, and other local events is encouraged! Please credit/link SABLE + Shank when selling finished products online. This pattern is not be used commercially to produce hundreds of thousands of copies.
