
Have you ever wished you could “knit” with your crochet hook? The crochet knit-stitch (also called the Waistcoat stitch) is a stitch that looks exactly like it was knitted when crocheted in the round.
The crochet knit-stitch is more properly known as the Waistcoat stitch and it makes a very thick, warm fabric. You can use it for bags, warm winter hats, and even storage baskets. Once you are comfortable crocheting this stitch head over here for a basic men’s beanie that looks knit, but is actually crocheted!
Disclaimer: This post contains affiliate links. When you purchase something using these links we get a small cut of the earnings. You do not pay any extra for the item you purchase.
For this tutorial I used:
- #4 Worsted weight Fishermen’s Wool yarn from Lion Brand
- 5mm Furls Streamline hook
How to Crochet the Knit Stitch: Step-by-step tutorial
The knit stitch (also called the Waistcoat stitch) is worked just like a single crochet stitch. The only difference is where you insert your hook. Instead of inserting it through the top of the stitch, you will push it through the center, or post of the stitch. This is why this stitch is also referred to as the Center Single Crochet.
When starting a hat or other project in the round I like to use the magic circle/magic ring (be sure to weave that tail in around the center multiple times and it will not come undone). You will work the first round of stitches (for single crochet I use a multiple of 6) the same as you normally would. Round 2 is where you will begin crocheting the knit-stitch technique illustrated below.
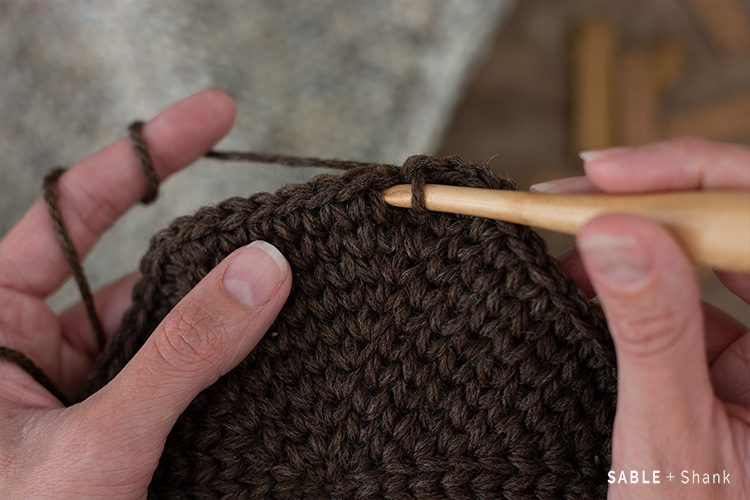
Step 1:
Locate the center of the stitch.
You can see in the picture below that my finger is pointing to the center of the next stitch, and that there are arrows pointing to the center of the post on the next 3 stitches. Notice how there are two almost vertical lines on either side? Those are the lines that are formed when you draw up a loop to make a normal single crochet. They will take on the appearance of the knitted V shape after a stitch is worked between them.

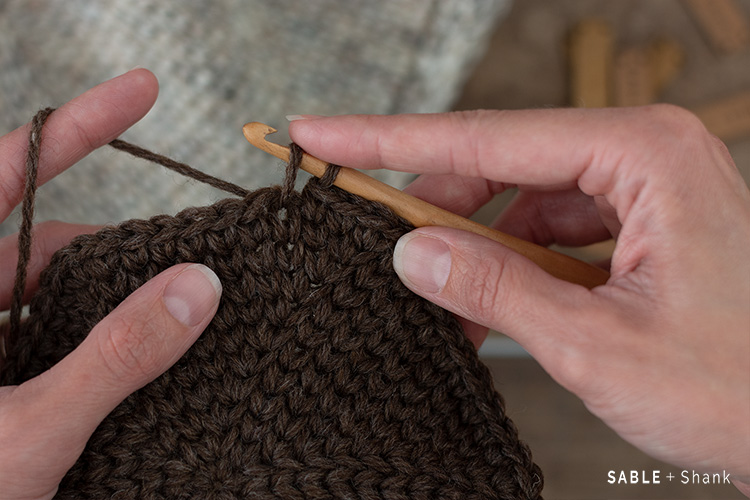
Step 2:
Insert your hook between the two vertical lines (the center of the stitch).
When crocheting in the round the center of the stitches in the first couple of rounds can be hard to see. Working in a well-lit room will help. To increase, work 2 stiches in the center of the stitch instead of only one.
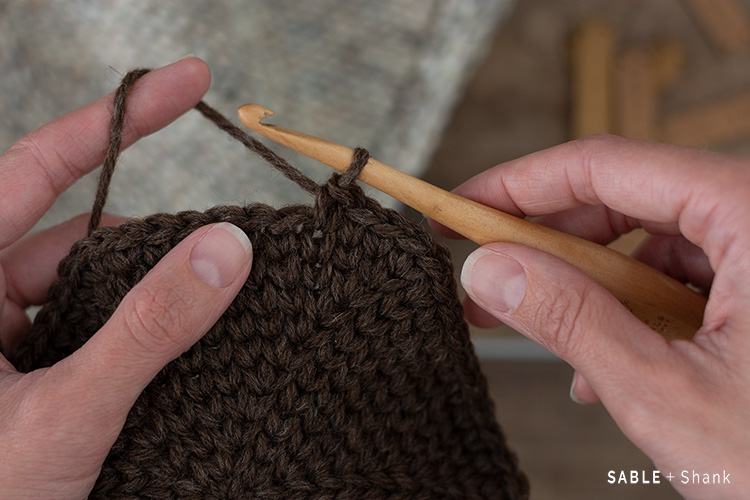
Step 3:
Pull up a loop as you normally would when making a single crochet stitch.
If making a hat or other wearable item, make sure this loop is a little bit longer than normal. The crochet knit-stitch can be very dense and thick, so pulling up a slightly longer loop than you typically would will help your fabric to not be so stiff. It also helps your finished item to feel more comfortable to the wearer. I pulled up a loop that was about 1/2″ tall for this project.
Step 4:
Complete the stitch as you would complete a traditional single crochet.
After completing the stitch make sure your tension has not tightened up. It is normal to have stitches of varying tension when first starting out with the knit stitch. Keep practicing and you will notice your stitches starting to look more uniform after several rounds. If you are working a top-down hat pattern you will increase in the same spot where you worked your last stitch. You can see where that is happening just to the left of my right thumb.
And that’s it! Just keep repeating steps 1-4 to make the additional stitches in the round. If your circle starts to pucker it means you are not making your stitches tall enough. Relax your tension or try going up a hook size or two and try again.
When done properly, your hat should not be so stiff it cannot move–it should be flexible and stretchy.

Ready to give it a try on a real pattern? Check out my easy knit stitch hat for men and boys right over here. It comes in 8 sizes so everyone in your family can have one.
SABLE + Shank is a participant in the Amazon Services LLC Associates Program, an affiliate advertising program designed to provide a means for sites to earn advertising fees by advertising and linking to Amazon.
